Main Interface of Sherpa Assistant#
To access the "Robots - Sherpa Assistant" window, click on the Sherpa Assistant icon in the tray:
- double-click with the left mouse button;
- right-click once to open the context menu and then select "Robots...":
.png)
The main interface of Sherpa Assistant contains actions for managing software Robots.
| No. | Element | Description |
| 1. | “Add Robot” button | Allows you to add a Robot from the “MyRobots” folder. |
| 2. | “Add Remote Robot” button | Allows you to add a remote Robot from the “MyRobots” folder. |
| 3. | “Delete Robot” button | Allows you to delete the selected Robot. |
| 4. | “Settings” button | Allows you to enter your username and password in the opened window. |
| 5. | “Refresh” button | Allows you to refresh the list of Robots in the Assistant window. |
| 6. | “Robot Name” column | Displays the project name. |
| 7. | “Hotkey” column | Allows you to view the key combinations that can be used to launch the project (Robot). |
| 8. | “Autostart” column | Allows you to flag projects (Robots) that will start with the agent program. To ensure the Process starts when Windows starts, the agent program must be added to the autostart list. If multiple Robots are selected, they will start sequentially in the Queue. |
| 9. | button .png) | Allows you to start the Process upon clicking. |
| 10. | button .png) | Allows you to open a context menu with available options for the selected project (Robot). |
| 11. | “Hotkey” field | Allows you to specify hotkeys for the selected project (Robot). |
| 12. | “Set Keys” button | Allows you to save hotkeys for the selected project (Robot). |
Authorization under Orchestrator User#
The authorization function under a specific Orchestrator User with subsequent loading of Folders and Processes from the Orchestrator available to that User. Thus, the User has the opportunity to use not only local Robots but also Robots to which access has been granted through the Orchestrator.
To do this, you need to:
- click the “Settings” button at the top of the window:
.png)
- in the pop-up “Settings” window, enter the username and password of the User (which is set for this User in the Orchestrator):
.png)
- click the “OK” button.
After logging in, the User will have access to Processes synchronized with the Orchestrator:
.png)
They can also be seen on the Processes screen of the Orchestrator:
.png)
The functionality of Access Folders in the Orchestrator allows:
- To restrict access for Users with different Roles to different sets of Processes;
- To visually separate Processes into different folders, which enhances the convenience of searching for and launching the required Processes in the Assistant window.
To use this functionality together with Sherpa Assistant, assign different Access Folders to different Processes in the properties of those processes through the Orchestrator. After that, in the Sherpa Assistant window, the logged-in User will only see those Processes from the Orchestrator to which they have access according to the Roles assigned to them in the Orchestrator and the Access Folders available to those Roles (and accordingly the Processes in those Access Folders). The logged-in User will also see the Processes not in a linear list but arranged in the corresponding Access Folders, as defined in the Orchestrator.
PiP Mode#
For each Robot in the list in the “Robots - Sherpa Assistant” window, the following options are available by clicking the button  :
:
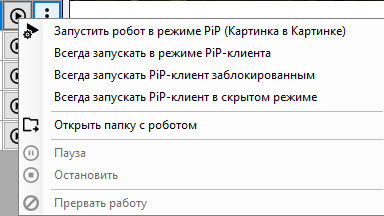
- “Run Robot in PiP (Picture in Picture) mode” option allows you to enable the function to start in PiP client mode. In the window “Do you want to run the robot “...” in PiP client mode?” click the “Yes” button.
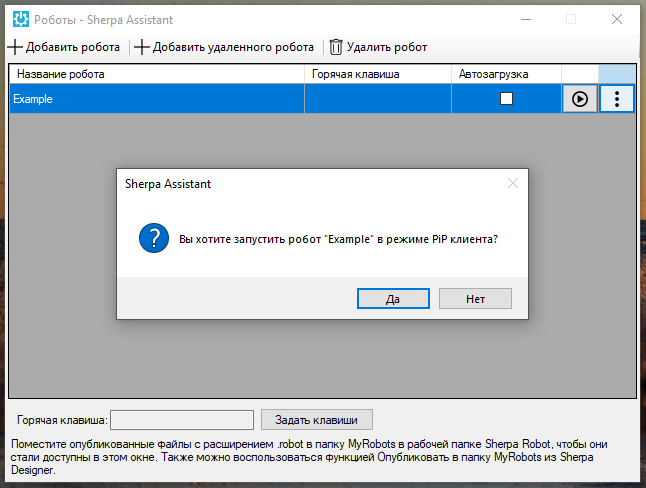
When this mode is enabled, the button “Run Robot” next to the option changes to “Stop Robot”.
.png)
- “Always run in PiP client mode” option – when this parameter is enabled, the Robot will always start with the PiP client interface visible to the User.
- “Always run PiP client locked” option – the Robot starts in a locked state (the PiP client interface is open, but the User cannot influence the Robot's operation).
- “Always run PiP client in hidden mode” option – the Robot starts, but the PiP client window is hidden and not displayed on the screen.
More about PiP mode:
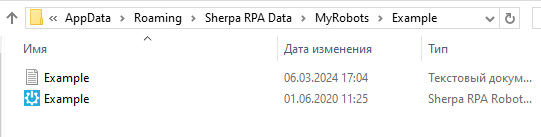
- “Open folder with robot” option allows you to open the folder with the Robot on your computer.
- “Pause” option allows you to pause the running Robot.
- “Stop” option allows you to stop the running Robot.
- “Interrupt work” option allows you to interrupt the running Robot.
The “Pause”, “Stop”, and “Interrupt work” options are active if one or more Robots are already running.
Check for Updates#
To check for updates for the Robot and Designer and download them from the website, select the “Check for updates...” item in the Sherpa Assistant menu in the system tray icon.

Then, if an update is found, you need to click the “Download update” button in the “Update Found” window:

Or, if you have the latest version of the program, simply close the window with the message: "You have the latest version of the program":

Internet access is required to check for updates.