Robots#
Robots are instances of the Sherpa RPA platform software deployed on specific user workstations, virtual machines, and terminal servers, connected for management to the Orchestrator. Robots can be grouped into Robot Groups. One Robot can be included in multiple Groups.
For more flexible management of a Robot's access to various resources, the same Robot can be assigned to process different Task Queues across different Processes.
The "Robots" screen contains two tables: "Robot Groups" and "Robots".
.png)
The "Robot Groups" table includes the following information:
| Column Name | Description |
| Name | Contains the name for the Robot Group. |
| Description | May include information about the Processes that the Robots in the Group perform or the scenarios in which they are used. |
| Access Folder | Indicates the Access Folder to which the Robot Group belongs. The Access Folder serves as a means of access control, allowing only those Users whose Roles provide access to interact with the Robot Group. Thus, the Access Folder not only controls who can see and manage the Robot Group but also ensures data security by creating a clear structure of User rights. |
The "Robots" table includes the following information:
| Name | Description |
| Robot Active | Indicates the current activity status of the Robot. It allows you to understand whether the Robot is currently active or disabled, and also to manually change the activity status using the toggle  . It is important to note that changing this status does not physically turn off the Robot on the remote machine; it simply informs the Orchestrator that no Tasks should be assigned to this Robot. This frees the Robot from performing tasks but does not affect its functioning or availability to the system. . It is important to note that changing this status does not physically turn off the Robot on the remote machine; it simply informs the Orchestrator that no Tasks should be assigned to this Robot. This frees the Robot from performing tasks but does not affect its functioning or availability to the system. |
| Name | Contains the name of each Robot. |
| Status | Contains the state of each Robot, including the following values:
|
| Type | Contains the type of Robot, defining its capabilities and purpose. Includes values: “Attended”, “Unattended”, “Coordinator”. |
| Description | Contains additional information about the Robot, such as its purpose, operational features, or configuration details. |
| License Expiration | Indicates the expiration date of the License required for the Robot to function correctly. |
| License | Contains data about the type of License used by each Robot in this group. |
| Last Communication | Indicates the date when the last data exchange occurred between the Robot and the server. |
| Access Folder | Indicates the Access Folder to which the Robot belongs. The Access Folder serves as a means of access control, allowing only those Users whose Roles provide access to interact with the Robot. Thus, the Access Folder not only controls who can see and manage the Robot but also ensures data security by creating a clear structure of User rights. |
Each column can be pinned, resized, or filtered by clicking on the icon 
You can also sort the rows of the table in ascending/descending order based on the values in the selected column by clicking on the empty area of the corresponding header. This allows for quick and convenient organization of data in the desired order.
Creating a New Robot#
To create a new Robot, you need to click the "Create" button in the "Robots" table and fill out the opened form:
.png)
 | If the "Role" field is left blank and saved, the flag will default to the "Attended" Role. |
Creating an Attended Robot#
Attended Robots are Robots that are manually launched on the User's computer, from startup, by a keyboard shortcut, or on a schedule from the Windows Task Scheduler.
For Attended Robots, it is sufficient to specify a display name and select the License used by the Robot License.
| No. p/p | Interface Element | Description |
| 1. | “Robot Active” toggle | An enabled toggle indicates that the Robot is active on the Orchestrator side. If the toggle is in the "Robot Inactive" position, a command to turn off this Robot will be sent to the Orchestrator upon request. |
| 2. | “Name” text field | The name of the Robot. This field is mandatory. |
| 3. | “Attended Role” flag | The Role of the Robot. |
| 4. | “Description” text field | Description of the Robot. |
| 5. | “Access Folder” text field | Allows specifying the Access Folder for the created Robot. |
| 6. | “License” field | Allows selecting the type of License for the Robot. Available options:
|
| 7. | “Create Job on Local Robot Launch” flag | Allows automatically creating a Job when the Robot is launched locally from Sherpa Assistant. |
Creating an Unattended Robot#
Unattended Robots are Robots launched by the Coordinator. The Coordinator starts Robots if there is a Job for them on the "Jobs" screen. A Job can be created manually, by Trigger, or via API.
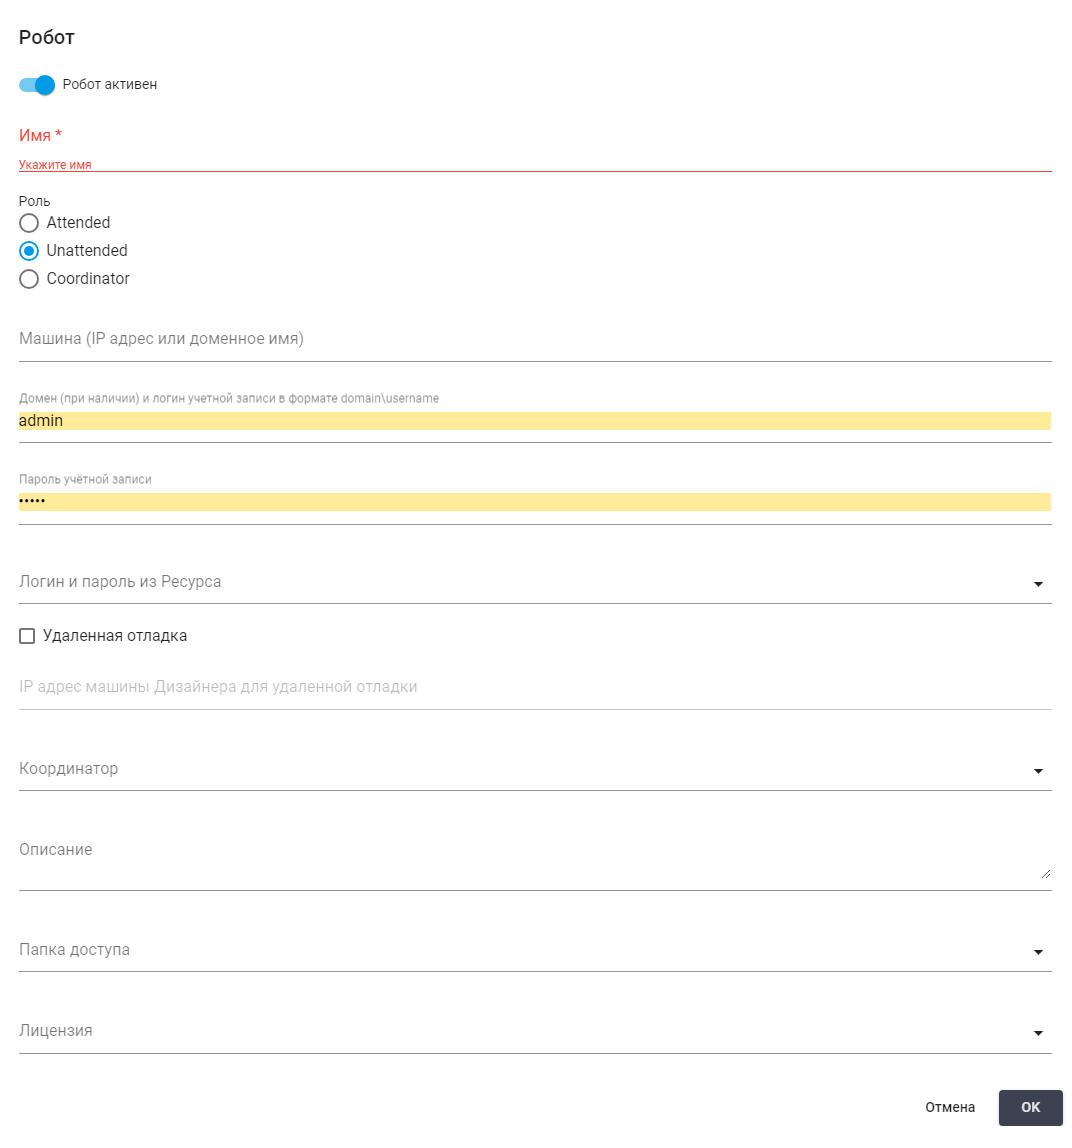
| No. p/p | Interface Element | Description |
| 1. | “Robot Active” toggle | An enabled toggle indicates that the Robot is active on the Orchestrator side. If the toggle is in the "Robot Inactive" position, a command to turn off this Robot will be sent to the Orchestrator upon request. |
| 2. | “Name” text field | The name of the Robot. This field is mandatory. |
| 3. | “Unattended Role” flag | The Role of the Robot. |
| 4. | “Machine (IP address or domain name)” text field | The IP address of the terminal server or virtual machine where this Robot is deployed. |
| 5. | “Domain (if any) and account login in the format domain\username” text field | The domain name of the terminal server or virtual machine where this Robot is deployed or the account login (if necessary including the domain) under which the Robot should run. |
| 6. | “Account Password” text field | The password for the user account under which the Robot should run. |
| 7. | “Login and Password from Resource” text field | Allows specifying the login and password from the selected Resource for this Robot. |
| 8. | “Remote Debugging” checkbox | Indicates that the Robot will run in remote debugging mode through Sherpa Designer. |
| 9. | “IP address of the Designer machine for remote debugging” text field | The IP address of the machine where Sherpa Designer is located, through which the Robot will run in remote debugging mode. |
| 10. | “Remote Debugging Server” text field | The server where remote debugging of this Robot will take place. |
| 11. | “Coordinator” text field | The instance of the Coordinator that will be used to launch this Robot. |
| 12. | “Description” text field | Description of the Robot. |
| 13. | “Access Folder” text field | Allows specifying the Access Folder for the created Robot. |
| 14. | “License” text field | Allows selecting the type of License for the Robot. Available options:
|
Creating a Coordinator#
Coordinator is a service used to launch Unattended Robots in user accounts where automatic login to Robot Accounts is required. It is installed from the corresponding Sherpa Coordinator distribution provided by the vendor and does not require a separate License. More about the Coordinator and its installation can be found in the section on Coordinator.
.png)
| No. p/p | Interface Element | Description |
| 1. | “Robot Active” toggle | An enabled toggle indicates that the Robot is active on the Orchestrator side. If the toggle is in the "Robot Inactive" position, a command to turn off this Robot will be sent to the Orchestrator upon request. |
| 2. | “Name” text field | The name of the Coordinator. This field is mandatory. |
| 3. | “Coordinator Role” flag | The Role of the Coordinator. |
| 4. | “Description” text field | Description of the Coordinator. |
| 5. | “Access Folder” text field | Allows specifying the Access Folder for the created Robot. |
To save the created Robot, after filling out the form, you need to click the "OK" button. The Robot will be created.
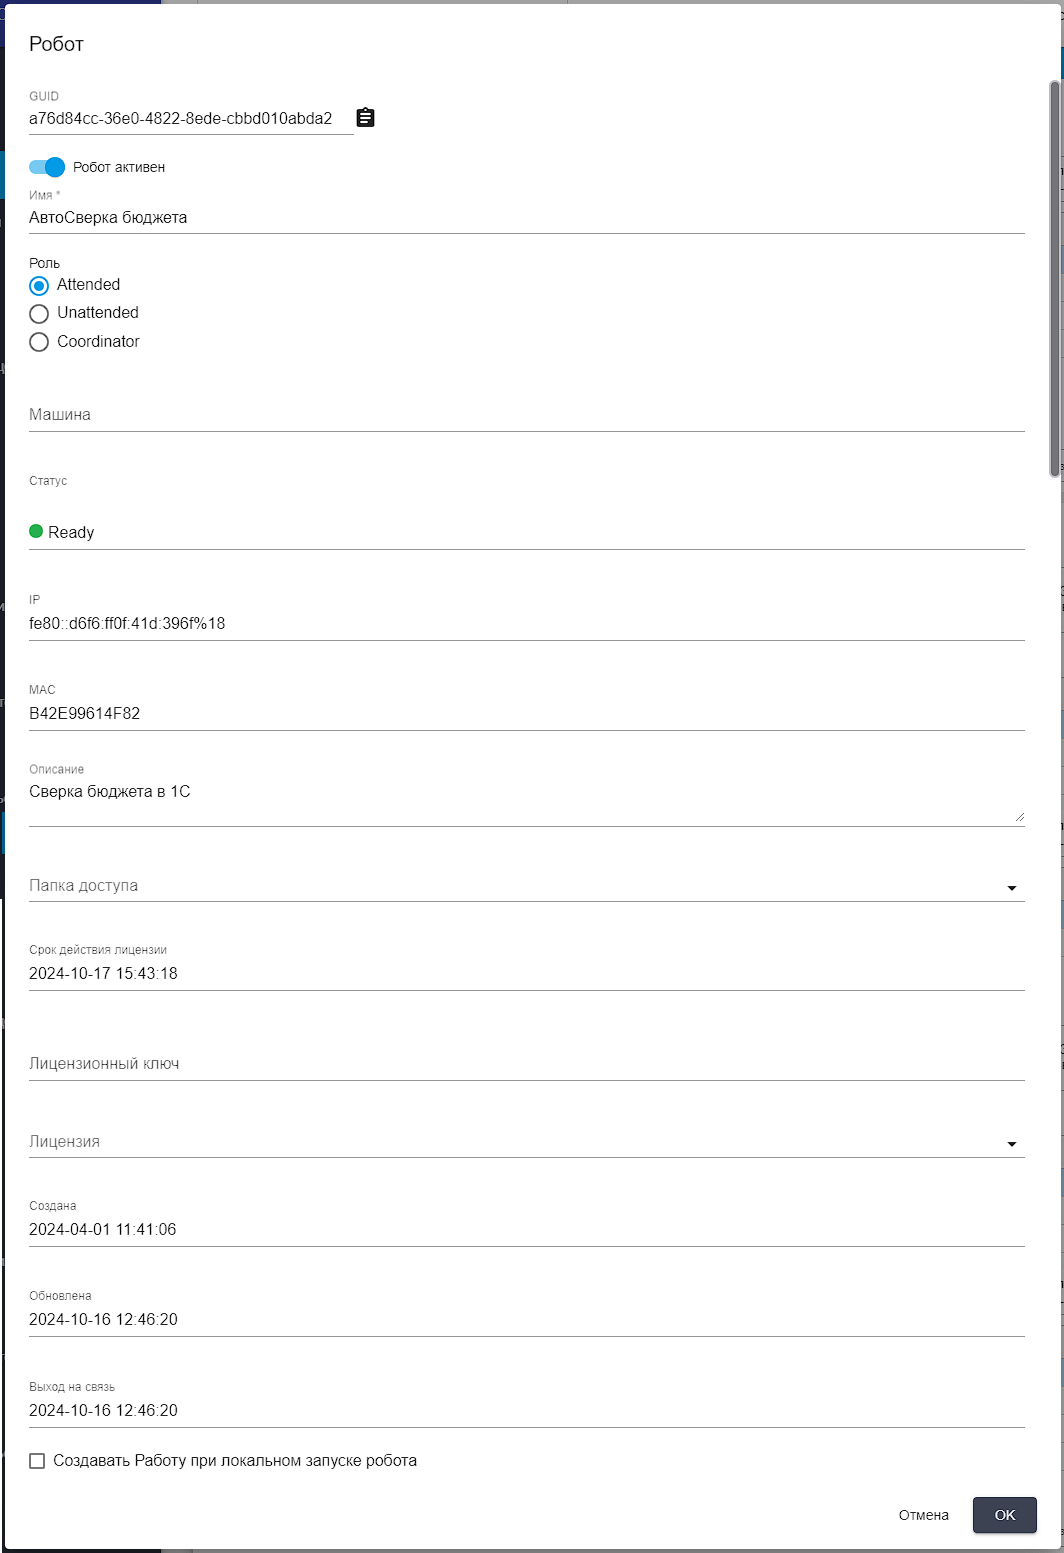
Editing a Previously Created Robot#
Editing a Previously Created Attended Robot#
To view and edit the properties of a specific Robot, you need to select it from the list and click the button .png) . After that, a form with the settings of the selected Robot will open, where you can make the necessary changes. In addition to the fields filled out when creating a new Robot, the edit form has additional settings.
. After that, a form with the settings of the selected Robot will open, where you can make the necessary changes. In addition to the fields filled out when creating a new Robot, the edit form has additional settings.
| No. p/p | Interface Element | Description |
| 1. | “GUID” text field | A unique identifier assigned to the Robot after its creation. This field cannot be edited. |
| 2. | “Status” text field | Status of the Robot. Possible options:
This field cannot be edited. |
| 3. | “IP” text field | The IP address of the terminal server or virtual machine where this Robot is deployed. This field can be edited only for Unattended and Attended Robots. |
| 4. | “MAC” text field | The MAC address of the terminal server or virtual machine where this Robot is deployed. This field can be edited. |
| 5. | “License Expiration” text field | The expiration date of the License. This field cannot be edited. |
| 6. | “License Key” text field | The license key of the Robot. This field can be edited. |
| 7. | “Created” field | The date and time the Robot was created. This field cannot be edited. |
| 8. | “Updated” field | The date and time the current Robot record was updated in the Orchestrator. This field cannot be edited. |
| 9. | “Last Communication” field | The date and time of the Robot's last communication. This field cannot be edited. |
Editing a Previously Created Unattended Robot#
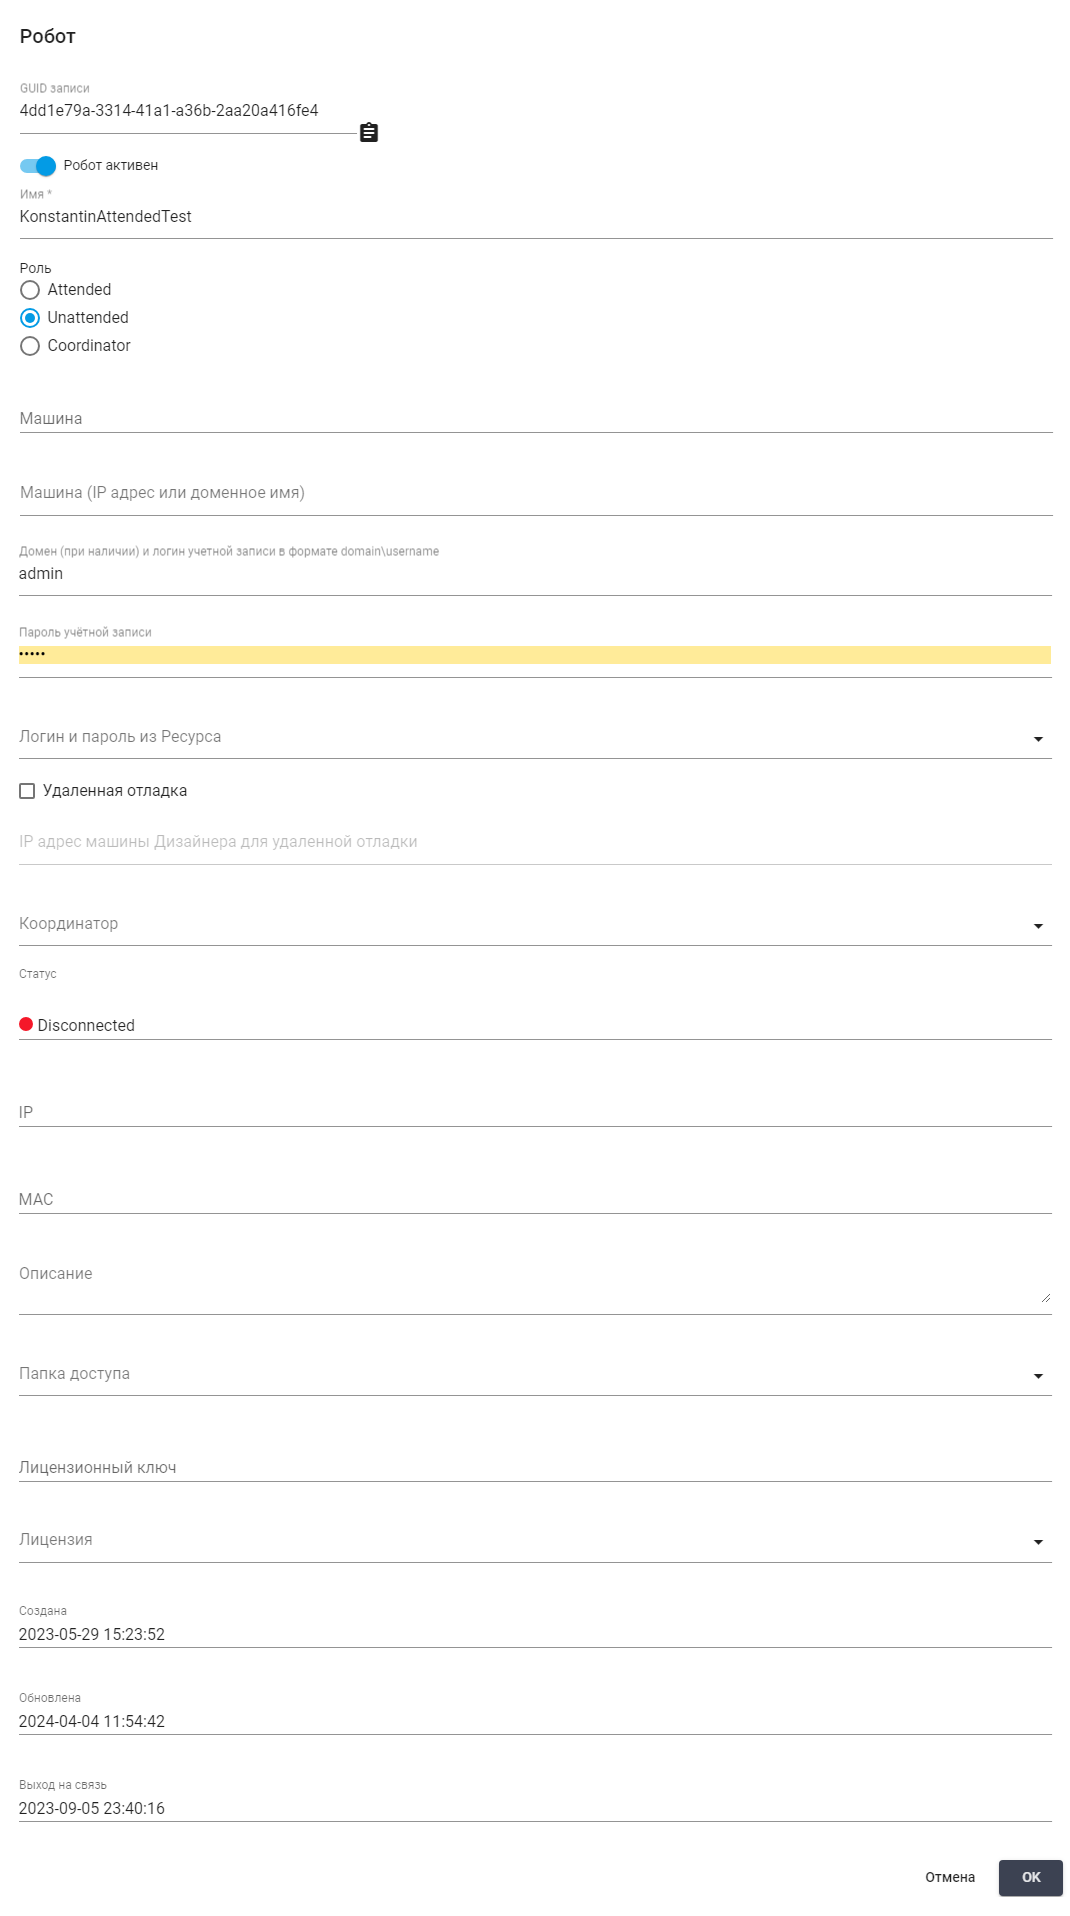
| No. p/p | Interface Element | Description |
| 1. | “GUID” text field | A unique identifier assigned to the Robot after its creation. This field cannot be edited. |
| 2. | “Status” text field | Status of the Robot. Possible options:
This field cannot be edited. |
| 3. | “IP” text field | The IP address of the terminal server or virtual machine where this Robot is deployed. This field can be edited only for Unattended and Attended Robots. |
| 4. | “MAC” text field | The MAC address of the terminal server or virtual machine where this Robot is deployed. This field can be edited. |
| 5. | “License Key” text field | The license key of the Robot. This field can be edited. |
| 6. | “Created” field | The date and time the Robot was created. This field cannot be edited. |
| 7. | “Updated” field | The date and time the current Robot record was updated in the Orchestrator. This field cannot be edited. |
| 8. | “Last Communication” field | The date and time of the Robot's last communication. This field cannot be edited. |
Editing a Previously Created Coordinator#
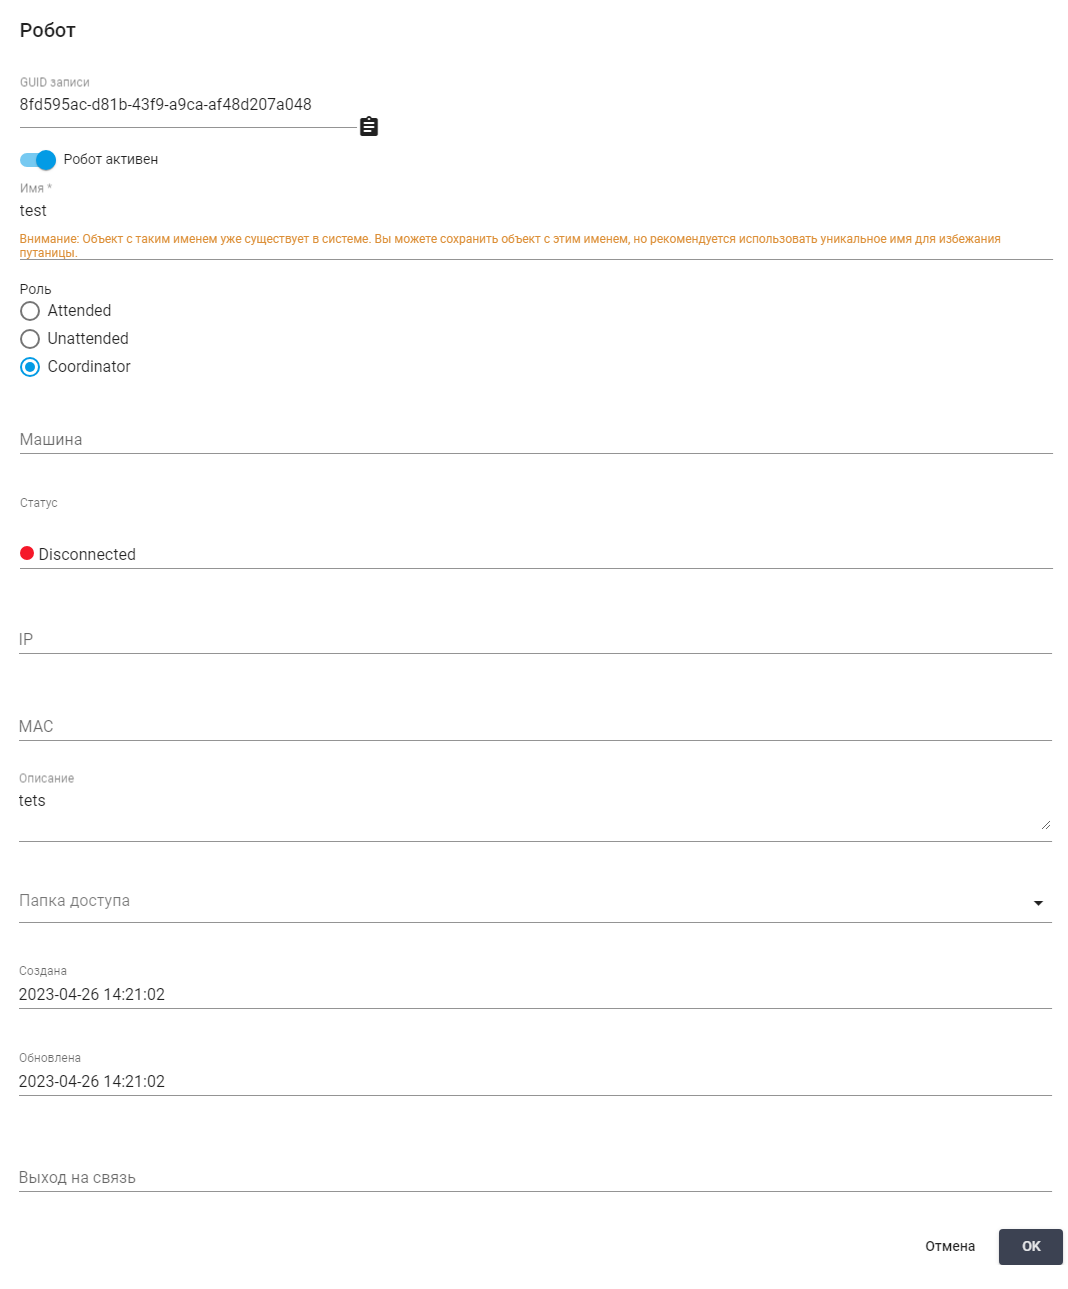
| No. p/p | Interface Element | Description |
| 1. | “GUID” text field | A unique identifier assigned to the Robot after its creation. This field cannot be edited. |
| 2. | “Status” text field | Status of the Robot. Possible options:
This field cannot be edited. |
| 3. | “IP” text field | The IP address of the terminal server or virtual machine where this Robot is deployed. This field can be edited only for Unattended and Attended Robots. |
| 4. | “MAC” text field | The MAC address of the terminal server or virtual machine where this Robot is deployed. This field can be edited. |
| 5. | “Created” field | The date and time the Robot was created. This field cannot be edited. |
| 6. | “Updated” field | The date and time the current Robot record was updated in the Orchestrator. This field cannot be edited. |
| 7. | “Last Communication” field | The date and time of the Robot's last communication. This field cannot be edited. |
Creating a New Robot Group#
The "Robot Groups" table allows grouping Robots together, combining them into logical groups.
For example, if necessary, you can create a Group for working within a specific terminal server, assign it a name, and add the corresponding Robots to it.
To display the list of Robots in the "Robots" table, you first need to select the required Robot Group.
The "All Robots" Group lists all available Robots present in the Orchestrator. It is created automatically and cannot be deleted.
When selecting the desired Robot Group, the lower "Robots" table will display a list of all Robots belonging to the selected Group, including the Robot with Coordinator functionality (for Unattended Robots).
 | The Coordinator is always in an active state, indicated by a green indicator. This service ensures the creation and maintenance of user account sessions for Unattended Robots within the used terminal server. |
All other Robots are technical accounts running on the same terminal server.
To create a new Robot Group, you need to click the "Create" button in the "Robot Groups" table and fill out the opened form: specify the name of the Robot Group (mandatory), the description of the Robot Group, and the Access Folder. To save the created Robot Group, after filling out the form, you need to click the "OK" button. The Robot Group will be created.
.png)
Editing a Previously Created Robot Group#
To view and edit the properties of a specific Robot Group, you need to select it from the list and click the icon  ("Edit").
After that, a form with the settings of the selected Robot Group will open, where you can make the necessary changes.
.png)
In addition to the fields filled out when creating a new Robot Group, the edit form has an additional field:
“Record GUID” – this is a unique identifier assigned to the Robot Group after its creation. This field cannot be edited.