Main Menu of the Template Designer#
The main menu of the Template Designer allows you to see data (calculated by the built-in OCR module) and offers basic actions for creating and processing templates.
.png)
| No. | Interface Element | Description |
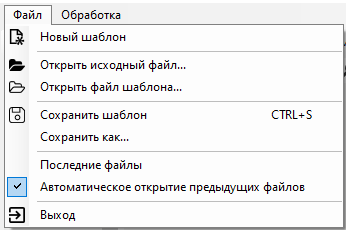
| 1. |
| Allows you to use basic functions for managing document and template files. |
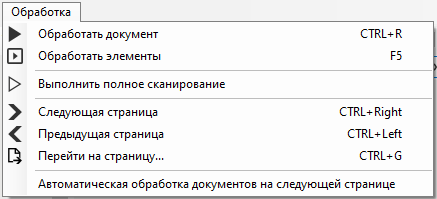
| 2. |
| Allows you to perform basic actions for processing the document. |
| 3. | “Save Template” button
| Allows you to save the scanned document, which will be used as a sample when creating a template for recognition by the Robot of a specific type of document. |
| 4. | “Open Source File” button
| Allows you to select and open a previously saved scanned document, which will be used as a sample when creating a template for recognition by the Robot of a specific type of document. |
| 5. | “Process Document” button
| Allows you to start processing the document based on the selected parameters to display:
|
| 6. | “Check” button
| Allows you to visually refresh the template layout after processing the document and making any edits to the template without resending the document for OCR processing:
|
| 7. | “Add Attribute” button
| Allows you to define and mark areas of the document whose data will be recognized by the Robot and imported into the “Results” table. |
| 8. | “Perform Full Scan” button
| Allows you to perform a full scan. |
| 9. | “Smart Assistant” button
| Allows you to analyze the document and create a template for the document. |
| 10. | “Show/Hide Thumbnails” button
| Allows you to show and hide thumbnails. |
| 11. | “Scale” switch
| Allows you to set the scale when working with the scanned document. |
| 12. | “Display” menu
| Allows you to manage the display of:
|


.png)
.png)
.png)
.png)
.png)
.png)
.png)