Creating a Task in the Orchestrator#
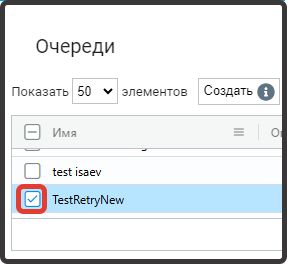
Select a queue from the "Queues" table where you need to create a task and mark it with a flag.
Next, click the "Create" button in the "Tasks" table and fill out the opened form.
.png)
- "Name" field (mandatory);
- "Description" field (if necessary);
- "Comment" field (if necessary);
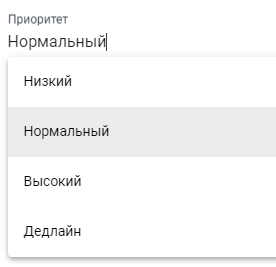
- "Priority" field (select the task execution priority using the dropdown list).
- "Tags" field (if necessary);
- "Repeat" field (number of task repetitions).
After filling out the form, click the "OK" button to save the created task.
Each created task has its current status indicated in the "Status" column.
.png)
- status "Created" (New) – a new task;
- status "In Progress" (InProgress) – the task is in progress;
- status "Successful" (Success) – the task has been successfully completed;
- status "Failed (Application)" – an error occurred during task execution. This status is assigned to tasks if the problem encountered can be resolved by re-executing the task (for example, due to a system hang that the robot is working with);
- status "Failed (Business)" – an error occurred during task execution. This status is used when the automatic attempt indicates problems with input data or the statuses of external information systems that the robot is working with, and re-executing the task is expected to be unproductive;
- status "Postponed" – the task is postponed. This status is automatically set from the Designer script if we want to postpone the task until a certain time, so that the Orchestrator returns this task back to the queue during that time;
- status "Abandoned" – this status is assigned if the task was taken for work but was not completed for more than 1 day.
When creating a task, the status "Created" is set by default. If necessary, the task status can be changed during its editing. To do this, click the button .png) in the row of the desired task, after which the task editing form will open.
in the row of the desired task, after which the task editing form will open.
.png)
In this form, you can change not only the task status but also specify the date and time until which the task is postponed, as well as the deadline date and time if necessary.
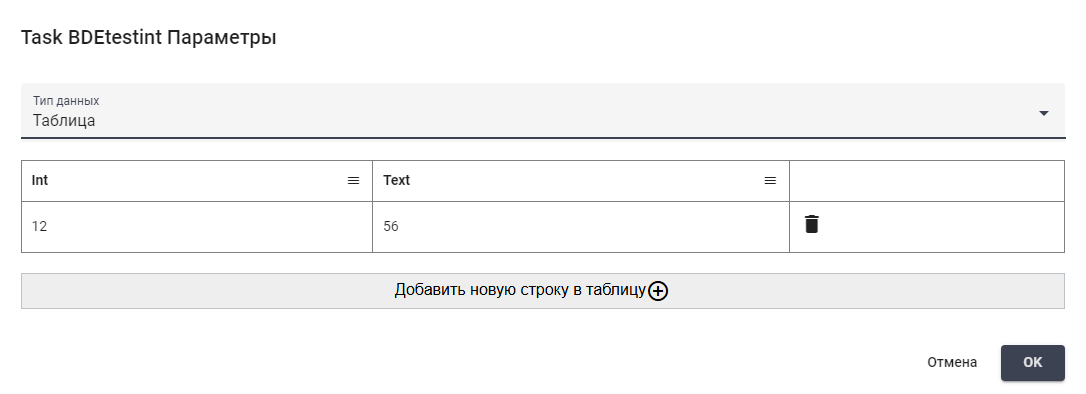
You can also set a set of parameters for each task. Thanks to this option, you can convey the essence of the task, for example, specify the document ID that the robot should work with, as well as indicate the path to the folder where the document is located.
To set the task parameters, click the button .png) , where three types of data are available:
, where three types of data are available:
- Text;
- Table;
- Hash table.
When selecting the "Text" data type, you can save the necessary text as a task parameter in the designated text field.
.png)
When selecting the "Table" data type, you can create and save a table as a task parameter in the designated table editor.
When selecting the "Hash table" data type, you can create and save a hash table (specifying key-value pairs) as a task parameter in the designated fields, where the parameter is the key.
.png)
Tasks from the script are accessed by GUID, which is assigned to each created task after its creation. At the end of the task execution, its status needs to be changed again, depending on whether it was completed successfully or unsuccessfully. As long as the task status is not changed to "In Progress," it can be taken by any robot, but with the status "In Progress," the task is assigned to a specific robot.