Creating Attributes#
The next step in creating a template is creating attributes.
Attributes allow you to define and designate areas of the document from which data will be recognized by the robot and imported into the "Results" table.
Attributes "Investor" and "Customer"
In our example, data about the Investor, Customer, as well as Date and Document Number should be imported into the results table.
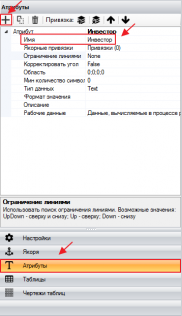
In the Template Designer, you need to add these attributes on the working panel on the right: select "Attributes," click the add button, and assign the attribute name "Investor."
To correctly recognize the area of the document from which data will be imported into the results, the attribute needs to be linked to previously created anchors.

In our example, the anchor on the right will be the anchor "Investor," and on the left – the anchor "by."
Anchor Bindings to the "Investor" Attribute
To create bindings in the created attribute, click "Anchor Bindings," then "Add Binding," and then left-click on the anchor word "Investor." Similarly, create a binding to the anchor word "by." Perform a check, as a result of which the data area of our attribute should be highlighted with a blue frame, as shown in the screenshot above.
To limit the data area of the attribute from the top, create a third anchor binding to the OCR block "Form by." Click "Add Binding," and left-click on the previously created anchor "Form by." In the binding parameters, select the value "Bottom," as we will use the lower boundary of this anchor as a reference.
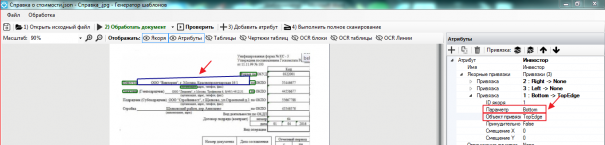
In addition to the parameter in the binding for this attribute, it is necessary to specify the "Binding Object." Since the data of the attribute may be located above the line that we highlighted using the first two anchors on the left and right.
In the "Binding Object" line, specify "TopEdge" – the upper edge.

Anchor Bindings to the "Customer" Attribute
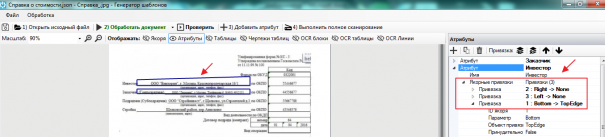
Similarly, create the "Customer" attribute, setting bindings to the previously created anchors "Customer" on the right, "by" on the left, and "organization" on top. For the binding to the top anchor, set the parameter "Bottom," and specify "TopEdge" as the "Binding Object."
As a result, each attribute should have three anchor bindings: on the right, on the left, and on top.
After checking, each attribute in the template will be displayed as a blue frame. If the frame boundaries do not capture the entire data area of the attribute, adjustments need to be made to the settings.
Limiting with Lines
In some documents, the field names that we use as anchors may not be located on the lower line with the field description, but above or in the middle, as shown in the picture below.
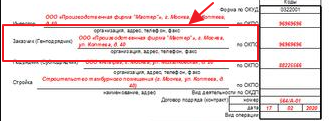
In such cases, for correct binding, we recommend using the additional parameter "Limiting with Lines." First, you need to check whether there are OCR lines in the template that limit the attributes we created.
Click the OCR lines button on the top working panel and check for the presence of lines.
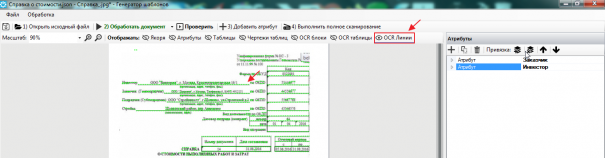
The lines are highlighted in green, and we can use them as an additional reference in working with attributes.
On the top working panel, select "Attributes," left-click on one of the attributes, after which it becomes active, and tools for working with the selected attribute open in the right working panel.
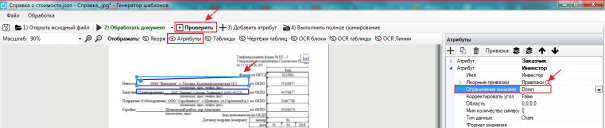
Select "Limiting with Lines," and from the dropdown list, choose the value "Down." This way, we limit the lower boundary of the attribute, which will now be oriented to the OCR lines.
Make sure to check the correctness of the attribute boundary display. If necessary, change the values of this parameter.
Creating Attributes "Number" and "Date." Anchor Bindings
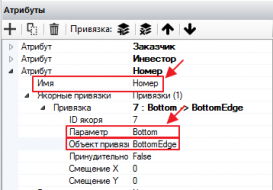
Add the attribute Number in the right working panel, assign the attribute name Number. Add bindings to the previously created anchors.
For the left binding, use the anchor Reference, and for the parameter, select Bottom, also specify Binding Object – BottomEdge.
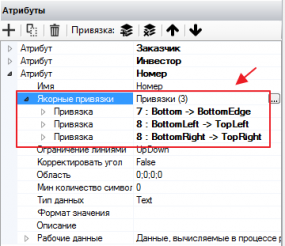
Create a second binding to the anchor number document. For the parameter, select BottomLeft (bottom left corner). Specify TopLeft (top left corner) as the binding object.
In the same way, create a binding for the attribute to the right corner. Create a third binding also to the anchor number document. For the parameter, select BottomRight (bottom right corner). Specify TopRight (top right corner) as the binding object.
Thus, three anchor bindings should be created for the attribute Number.
After checking, a blue rectangle should appear in the template, inside which the data of our attribute is displayed.

Creating the attribute Date.
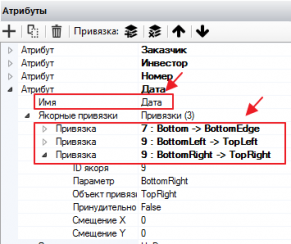
Add the attribute Date in the right working panel, assign the attribute name Date. Add bindings to the previously created anchors.
For the left binding, use the anchor Reference, and for the parameter, select Bottom, also specify Binding Object – BottomEdge.
Create a second binding to the anchor date composition. For the parameter, select BottomLeft (bottom left corner). Specify TopLeft (top left corner) as the binding object.
In the same way, create a binding for the attribute to the right corner. Create a third binding also to the anchor date composition. For the parameter, select BottomRight (bottom right corner). Specify TopRight (top right corner) as the binding object.
As a result, three anchor bindings should be created for the attribute Number.
After checking, a blue rectangle should appear in the template, inside which the data of our attribute is displayed.

Data type – DateTime.
Value format – manually specify the format required for the attribute. In our example, it is dd.MM.yyyy
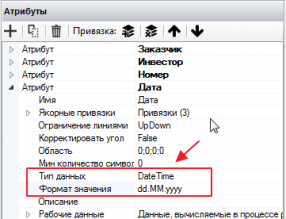
If in any document the date is indicated as November 30, 2022, it will be transformed into 30.11.2022 as a result.