Triggers#
Triggers are necessary to automatically create Jobs based on specified conditions, which are then passed to Robots for processing.
The "Triggers" screen contains the "Triggers" table.
.png)
To work with Triggers, the screen has the following buttons:
| Name | Description |
| Create | Allows the User to create a new Trigger. When clicked, a form opens for entering the necessary data and configuring the parameters of the new Trigger. |
| Update | Allows updating information about the selected Trigger. |
| Delete selected | Allows deleting one or more selected Triggers. |
| Enable selected | Activates the selected Triggers, allowing them to start Jobs in the system. |
| Disable selected | Deactivates the selected Triggers, stopping their execution. |
| Test | Allows testing the selected Trigger by creating a Job according to the settings specified in the Trigger. This helps ensure that the Trigger works correctly and performs the planned actions. |
| Import from CSV | Allows the User to upload Trigger data from a CSV file. When this option is selected, a dialog window opens for uploading the file with the necessary data. |
| Export to CSV | Allows saving information about Triggers in CSV format. |
| Export to XLSX | Allows exporting Trigger data in XLSX format. |
Creating a New Trigger#
To create a new Trigger, you need to click the "Create" button in the "Triggers" table and fill out the opened form.
The form for creating a new Trigger contains several tabs:
Main Tab#
The "Main" tab contains the main parameters of the Trigger being created:
 (1).png)
| No. | Interface Element | Description |
| 1. | “Trigger enabled” switch | Allows you to choose whether the Trigger will be activated (enabled) immediately after its creation. |
| 2. | “Name” text field | The name of the Trigger. A required field. |
| 3. | “Description” text field | Description of the Trigger. |
| 4. | “Access Folder” field | Access folder for the Trigger. |
| 5. | “Priority of created Jobs” field | Allows managing the order of Job execution:
If a priority is set for both the Job and the Task, the Job will be executed first, followed by the Task, according to the specified priority. |
| 6. | “Process” field | The process that will be triggered when the Trigger is activated. The process can be selected from previously created Processes on the "Processes" screen. A required field. |
| 7. | “Max. number of runs” text field | The maximum number of runs for the Trigger. If there are no restrictions, this field should be set to 0. |
| 8. | “If all Robots are busy, create Job after they are free” flag | Allows enabling the function of creating a Job after the Robots are freed. |
Robots Tab#
The "Robots" tab allows you to select which Robot or Group of robots will receive the Job created by the Trigger after it is activated.
.png)
| No. | Interface Element | Description |
| 1. | “Assign Job to a specific Robot” flag | Allows assigning the Job created by the Trigger to a specific Robot (selected in the “Robot” field). |
| 2. | “Robot” field | Allows selecting a specific Robot from previously created ones on the "Robots" screen using a dropdown list. |
| 3. | “Distribute Job among Robot Group” flag | Allows assigning the Job created by the Trigger to a specific Group of robots (selected in the “Robot Group” field). In this case, the Job created by the Trigger will be assigned to one of the Robots in the specified group. |
| 4. | “Robot Group” field | Allows selecting a specific Group of robots from previously created ones on the "Robots" screen using a dropdown list. |
| 5. | “Maximum number of concurrently running Robots” text field | The maximum number of concurrently running Robots that will perform Jobs created by this Trigger. This setting allows for load balancing among Robots. It is important to note that this value also affects the number of Jobs created in the mode “Create Job without a pre-assigned Robot.” Thus, the number of Jobs in Pending status for the Robot Group cannot exceed the set value of “Maximum number of concurrently running Robots” if it is not equal to 0. |
| 6. | “Create Job without a pre-assigned Robot. As soon as any Robot in the Group is free, the Job will be automatically assigned to it” flag | This function is available if all Robots in the specified Group are busy. |
| 7. | “Create Job for the still busy Robot in the Group with the least number of Jobs in Pending status” flag | This function is available if all Robots in the specified Group are busy. |
Schedule Tab#
The "Schedule" tab allows you to set a schedule for when the Trigger will be activated. The form for creating a new Trigger varies depending on which flags are set:
- “Process continuously” flag
- “Process according to schedule” flag
- “Last day of the month” flag
- “N-th day of the month” flag
Process Continuously#
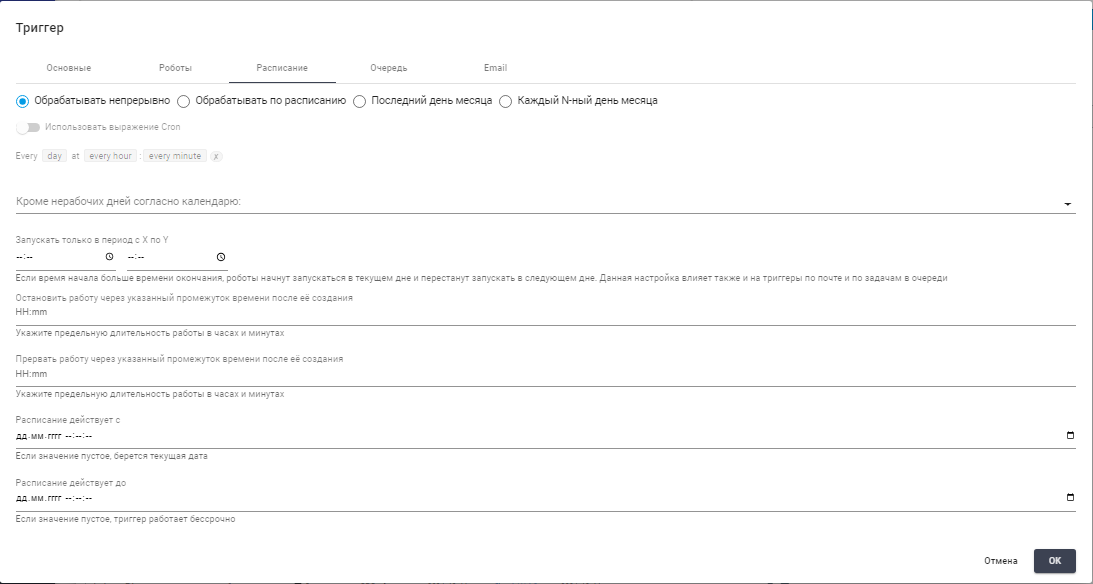
| No. | Interface Element | Description |
| 1. | “Process continuously” flag | Allows performing Jobs continuously, taking into account the restrictions set on other tabs. |
| 2. | “Except non-working days according to the calendar:” field | Allows selecting a specific calendar from previously created ones on the "Resources" screen using a dropdown list. |
| 3. | “Stop Job after a specified period of time after its creation” text field | Allows specifying the maximum duration of the Job in hours and minutes in the format hours:minutes until a “soft” stop. A "soft" stop is sending a stop signal to the script, which contains the corresponding block to check this signal, allowing the program to finish its work. |
| 4. | “Run only between X and Y” field | Allows specifying the time period for the Trigger's operation within one day. If the start time is greater than the end time, Robots will start running on the current day and will stop running on the next day. This setting also affects email Triggers and Task Triggers in the Queue. |
| 5. | “Interrupt Job after a specified period of time after its creation” text field | Allows specifying the maximum duration of the Job in hours and minutes in the format hours:minutes until a “hard” stop. A "hard" stop is the immediate termination of the Process execution, when the script is interrupted without prior conditions. |
| 6. | “Schedule effective from” field | Allows specifying the date and time from which the schedule is effective, in the format DD.MM.YYYY hours:minutes:seconds. If the value is empty, the current date is taken. |
| 7. | “Schedule effective until” field | Allows specifying the date and time until which the schedule is effective, in the format DD.MM.YYYY hours:minutes:seconds. If the value is empty, the default value will be set (current time + 10 years). |
Process According to Schedule#
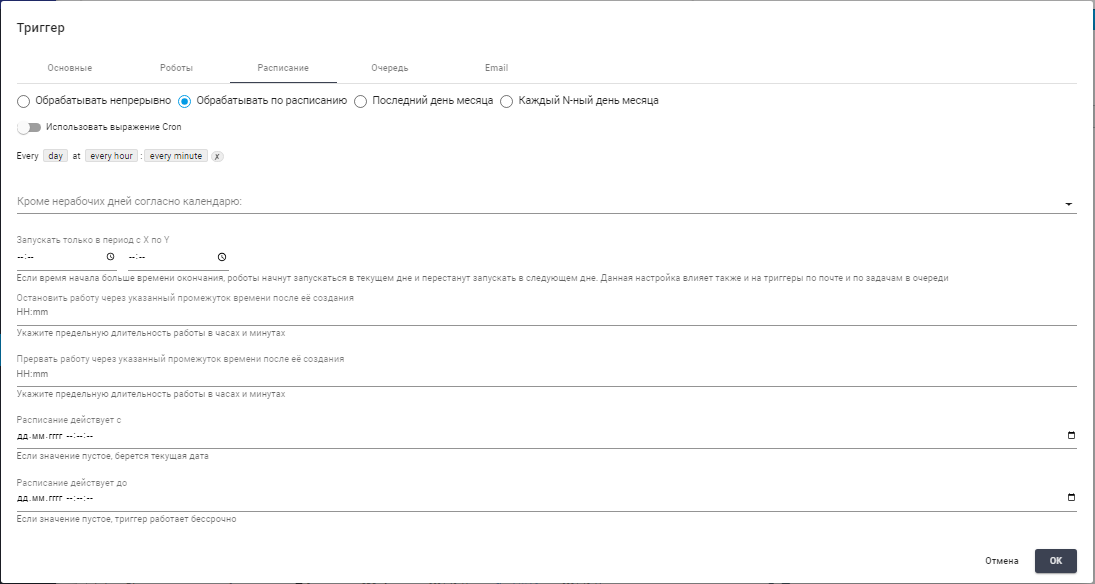
| No. | Interface Element | Description |
| 1. | “Process according to schedule” flag | Allows performing Jobs according to a schedule. |
| 2. | “Use Cron expression” switch | Allows defining the schedule for the Trigger activation directly by specifying a Cron expression. |
| 3. | 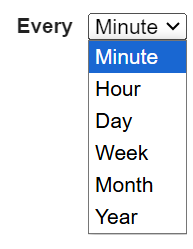 | Allows setting the schedule for the Trigger activation. |
| 4. | “Except non-working days according to the calendar:” field | Allows selecting a specific calendar from previously created ones on the "Resources" screen using a dropdown list. On the days selected in the specified calendar, the Trigger will not activate (these days will be considered non-working). |
| 5. | “Run only between X and Y” field | Allows specifying the time period for the Trigger's operation within one day. If the start time is greater than the end time, Robots will start running on the current day and will stop running on the next day. This setting also affects email Triggers and Task Triggers in the Queue. |
| 6. | “Stop Job after a specified period of time after its creation” text field | Allows specifying the maximum duration of the Job in hours and minutes in the format hours:minutes until a “soft” stop. |
| 7. | “Interrupt Job after a specified period of time after its creation” text field | Allows specifying the maximum duration of the Job in hours and minutes in the format hours:minutes until a “hard” stop. |
| 8. | “Schedule effective from” field | Allows specifying the date and time from which the schedule is effective, in the format DD.MM.YYYY hours:minutes:seconds. If the value is empty, the current date is taken. |
| 9. | “Schedule effective until” field | Allows specifying the date and time until which the schedule is effective, in the format DD.MM.YYYY hours:minutes:seconds. If the value is empty, the default value will be set (current time + 10 years). |
Last Day of the Month#
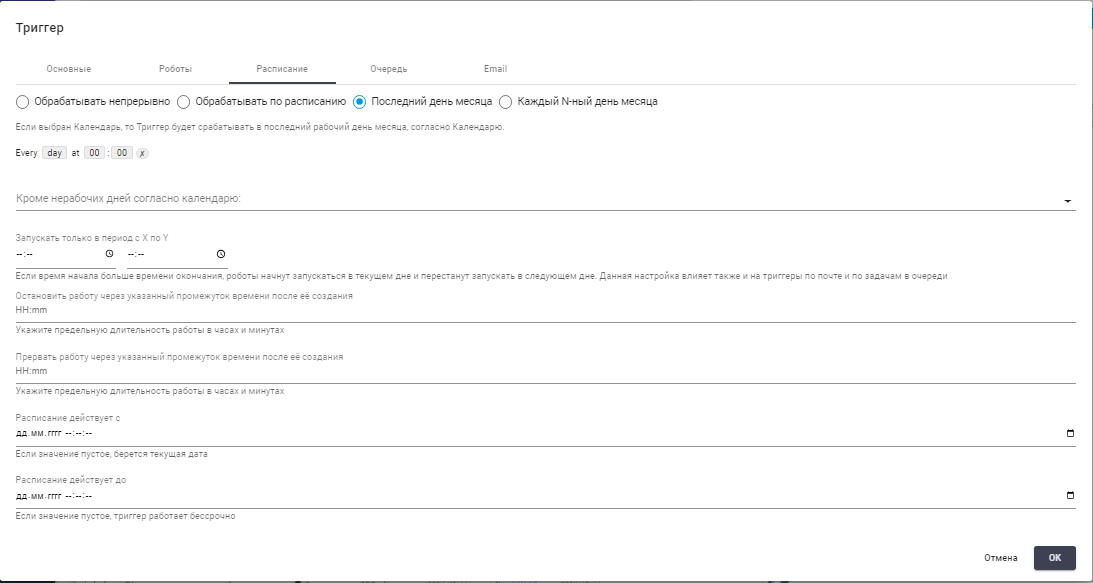
| No. | Interface Element | Description |
| 1. | “Last day of the month” flag | Allows performing Jobs on the last day of the month. The Trigger will activate on the last calendar day of the month unless a calendar of non-working days is selected below. Otherwise, the Trigger will activate on the last working day of the month according to the calendar. |
| 2. | | Allows setting the schedule for the Trigger activation. |
| 3. | “Except non-working days according to the calendar:” field | Allows selecting a specific calendar from previously created ones on the "Resources" screen using a dropdown list. On the days selected in the specified calendar, the Trigger will not activate (these days will be considered non-working). |
| 4. | “Run only between X and Y” field | Allows specifying the time period for the Trigger's operation within one day. If the start time is greater than the end time, Robots will start running on the current day and will stop running on the next day. This setting also affects email Triggers and Task Triggers in the Queue. |
| 5. | “Stop Job after a specified period of time after its creation” text field | Allows specifying the maximum duration of the Job in hours and minutes in the format hours:minutes until a “soft” stop. |
| 6. | “Interrupt Job after a specified period of time after its creation” text field | Allows specifying the maximum duration of the Job in hours and minutes in the format hours:minutes until a “hard” stop. |
| 7. | “Schedule effective from” field | Allows specifying the date and time from which the schedule is effective, in the format DD.MM.YYYY hours:minutes:seconds. If the value is empty, the current date is taken. |
| 8. | “Schedule effective until” field | Allows specifying the date and time until which the schedule is effective, in the format DD.MM.YYYY hours:minutes:seconds. If the value is empty, the default value will be set (current time + 10 years). |
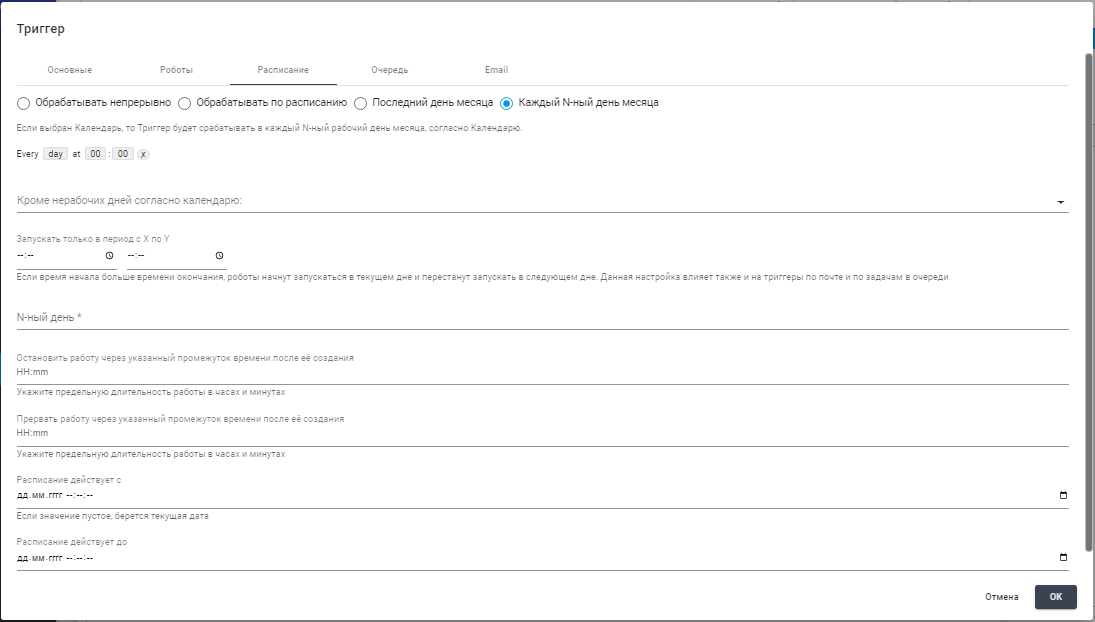
Every N-th Day of the Month#
| No. | Interface Element | Description |
| 1. | “N-th day of the month” flag | Allows performing Jobs every N-th day of the month. The Trigger will activate on the N-th calendar day of the month unless a calendar of non-working days is selected below. Otherwise, the Trigger will activate on the N-th working day of the month according to the calendar. |
| 2. | | Allows setting the schedule for the Trigger activation. |
| 3. | “Except non-working days according to the calendar:” field | Allows selecting a specific calendar from previously created ones on the "Resources" screen using a dropdown list. A required field. On the days selected in the specified calendar, the Trigger will not activate (these days will be considered non-working). If a calendar is selected, the Trigger will activate not on every N-th calendar day of the month, but on every N-th working day of the month. |
| 4. | “Run only between X and Y” field | Allows specifying the time period for the Trigger's operation within one day. If the start time is greater than the end time, Robots will start running on the current day and will stop running on the next day. This setting also affects email Triggers and Task Triggers in the Queue. |
| 5. | “N-th day” text field | Allows specifying the N-th day of the month. A required field. |
| 6. | “Stop Job after a specified period of time after its creation” text field | Allows specifying the maximum duration of the Job in hours and minutes in the format hours:minutes until a “soft” stop. |
| 7. | “Interrupt Job after a specified period of time after its creation” text field | Allows specifying the maximum duration of the Job in hours and minutes in the format hours:minutes until a “hard” stop. |
| 8. | “Schedule effective from” field | Allows specifying the date and time from which the schedule is effective, in the format DD.MM.YYYY hours:minutes:seconds. If the value is empty, the current date is taken. |
| 9. | “Schedule effective until” field | Allows specifying the date and time until which the schedule is effective, in the format DD.MM.YYYY hours:minutes:seconds. If the value is empty, the default value will be set (current time + 10 years). |
Queue Tab#
The "Queue" tab allows creating Jobs when new Tasks appear in the Queue.
.png)
| No. | Interface Element | Description |
| 1. | “Create Jobs when new Tasks appear in the Queue” flag | Allows enabling the function of creating Jobs when new Tasks appear in the Queue. |
| 1.2. | "Queue" field | Allows selecting a specific Queue from previously created ones on the "Queues" screen using a dropdown list. |
| 1.3. | "Consider only tasks tagged with all listed tags simultaneously" field | Allows selecting tags that the corresponding Tasks in the Queue are marked with. Available if the "Queue" field is filled in. |
| 1.4. | "Run when new Tasks exceed" text field | Allows specifying a value greater than 0 if the Robot will not start immediately upon the appearance of a Task in the selected Queue, but when the Queue has the specified number of new Tasks (for example, 5). |
| 1.5. | "Set status for the Task received from the Queue" field | Allows specifying the status of the Task. Possible options:
|
| 1.6. | "Complete when Queue is empty" flag | Allows enabling the function of completing the Trigger (the status will be set to "Completed") when there are no Tasks in the Queue. |
| 2. | “Assign Default Task to created Jobs” flag | Allows binding the Trigger to a specific Task and using this Task as the default Task when creating Jobs by the Trigger. |
| 2.1. | “Task” field | Allows selecting a specific Task from previously created ones on the "Queues" screen using a dropdown list. |
Email Tab#
The "Email" tab allows configuring the Trigger with specific conditions for creating Jobs related to email processing.
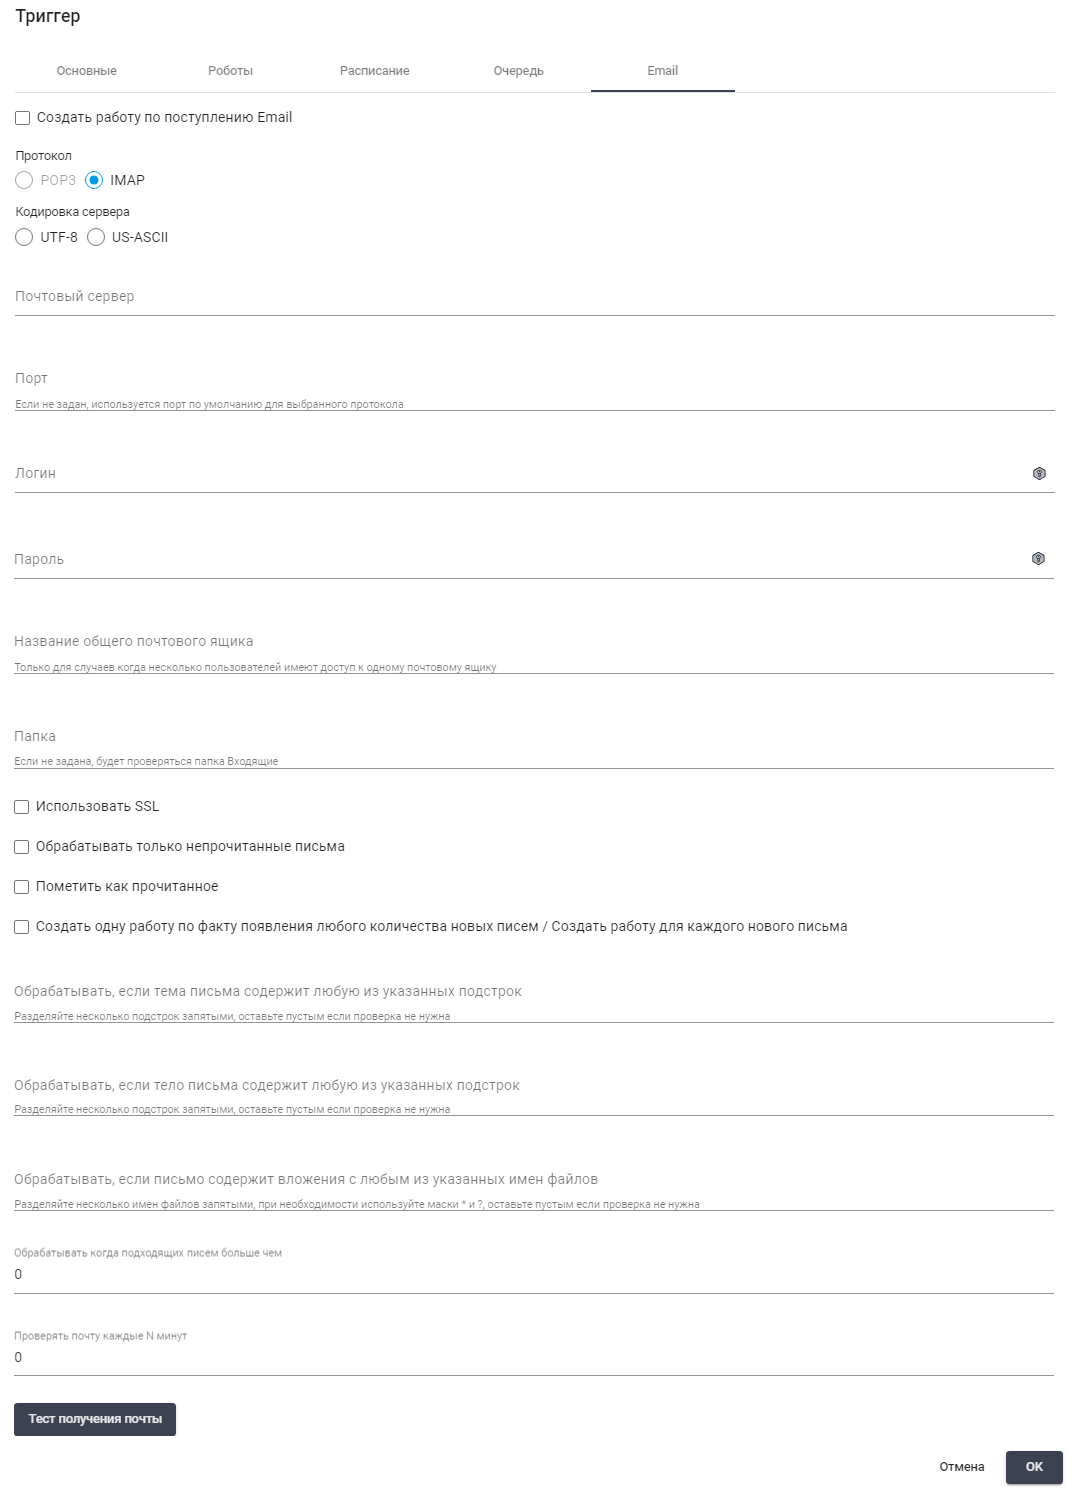
| No. | Interface Element | Description |
| 1. | “Create Job upon receiving Email” flag | Allows creating a Job upon receiving an email. |
| 2. | “POP3” and “IMAP” protocol flags | Email retrieval protocol. |
| 3. | “Server Encoding: “UTF-8” and “US-ASCII” flags | Server encoding. |
| 4. | “Mail Server” text field | Mail server. |
| 5. | “Port” text field | Mail server port. If the port is not specified, the default port for the selected protocol is used. |
| 6. | “Login” text field | Login for accessing the mail server. |
| 7. | “Password” text field | Password for accessing the mail server. |
| 8. | “Shared Mailbox Name” text field | Name of the shared mailbox. Specified only when multiple Users have access to the same mailbox. |
| 9. | “Folder” text field | Folder in the mailbox. If the folder is not specified, the “Inbox” folder will be checked. For nested folders, several path separators are possible: / , \ , | or . (depends on the mail server, for example, Yandex uses / as a separator) |
| 10. | “Use SSL” flag | Indicates whether to use SSL when connecting to the mail server. |
| 11. | “Process only unread emails” flag | Allows enabling the processing of only unread emails. |
| 12. | “Mark as read” flag | Allows marking as read the emails for which Jobs were created. |
| 13. | “Create one Job for any number of new emails / Create Job for each new email” flag | Allows enabling the function of creating one Job for any number of new emails or a separate Job for each new email. |
| 14. | “Process if the email subject contains any of the specified substrings” text field | Substrings that must be contained in the email subject. When specifying multiple substrings, they must be separated by commas. If no check is needed, the text field should be left empty. |
| 15. | “Process if the email body contains any of the specified substrings” text field | Substrings that must be contained in the email body. When specifying multiple substrings, they must be separated by commas. If no check is needed, the text field should be left empty. |
| 16. | “Process if the email contains attachments with any of the specified file names” text field | File names that must be contained in the email attachments. When specifying multiple file names, they must be separated by commas, and masks * and ? can be used if necessary. If no check is needed, the text field should be left empty. |
| 17. | “Process when suitable emails exceed” field | Allows starting processing (checking Trigger conditions and creating Jobs if necessary) if the number of suitable emails exceeds the specified number. |
| 18. | “Check mail every N minutes” field | Allows setting the time interval (in minutes) after which the mail is checked on the server and Jobs are created if necessary (if the above Trigger conditions are met). |
| 19. | “Test mail retrieval” button | Allows checking the connection to the mail server and obtaining information about the number of emails that meet the conditions specified in the Trigger. |
Editing a Previously Created Trigger#
To view and edit the properties of a specific Trigger, you need to select it from the list and click the icon  . After that, a form with the Trigger settings will open, where you can make the necessary changes. There are no new fields in the previously created Trigger.